FREQUENTLY ASKED QUESTIONS
Shortcuts
- General
- Splitboard Clips
- Prime System Bindings
- Bindings and Interfaces
- Heel Lock Down and Dual Risers
- Crampons
- Vert Adapters
- Air Strap
- Return Policy & Privacy Policy
General
Does the Karakoram Interface use the same mounting hole pattern as Voile?
Yes, the Karakoram interface mounts to the insert pattern used on production splitboards that can also use the Voile Interface.
Can I use Karakoram bindings with Voile pucks?
No, Karakoram bindings use a new interface with five attachment points to provide a stiffer connection to the board.
Can I swap out my Voile China Clips with Karakoram Splitboard Clips?
Yes, for most splitboards you will need a 3/32 Allen Wrench and a 3/8″ Wrench. One of the holes on the Karakoram splitboard clips is threaded so make sure you read the instructions. No drilling is required to mount the splitboard clips.
Can I use Karakoram bindings with Voile Chinese hooks?
Karakoram bindings must be used with Karakoram Splitboard Clips and are not compatible with Voile Chinese hooks.
Where are your bindings made?
Bindings are assembled in our shop in North Bend, WA. All of our machined, injection molded, bent sheet metal and turned parts are made in the greater Seattle, WA area. We do source our straps and a few small components from over seas suppliers. 95% of our components are manufactured in the USA. Click here for more information.
Splitboard Clips
Set-up | Use | Maintenance
Splitboard Clip Set-Up
Should I be concerned with the wire bale on the board clip sticking out past the inside edge?
We haven’t had any issues with the bails catching on anything through testing. If you are concerned, the bale flips back on the lever and hold in place.
One of the holes on the board clips is too small for the screw, what do I do?
One of the holes on the Karakoram splitboard clips is threaded so make sure you read the instructions. No drilling is required to mount the splitboard clips. Click here for instructions.
The Board Clips that came with my factory board are too loose. What can I do?
All 13-14 board clips have an adjustable tensioning feature. Simply loosen the screws on the hook side of the Board Clips, slide the hook side away from the bail side, and tighten them back down in the new position. This will increase the clamping force of the Board Clips. If your board clips are older than ’13-14, you can roll the hook over slightly by tapping on it with a hammer, or gently bending it in a vise.
How tight should the board clips be?
The board clips should snap into place, but should not be difficult to lift. If the board clips feel too tight, you can loosen the nuts on the hook side and reposition the hook. On pre ’13-’14 board clips you can open up the mounting holes on the hook side of the board clips using a 5.4mm (#3 ANSI) drill bit and up to a 5.5mm (7/32 ANSI) drill bit.
What can be done if the 3/32″ hex drive strips?
You can add a slot to the head of the screw with a dremel and a cut-off wheel. Once the slot is added you can use a flat head screw driver to spin the screw.
Splitboard Clip Use
My board clips sometimes work differently in the snow than when dry, what’s wrong?
Make sure the inside edge is cleared of ice build up.
The wire bale on my board clips won’t flip all the way back, what can I do?
Some production splitboards use long screws to attach the china clips. The long screws on the lever and bale side can prevent the wire bale from being flipped back on the lever. This screw can be cut down to prevent the interference.
Splitboard Clip Maintenance
What maintenance do I need to perform on my board clips?
Board clips should not require any maintenance other than checking the tightness of the hardware. For 2013-2014 all board clips will come with an adjustable tensioning feature. This allows the board clips to maintain a cam-over across a wider range of standard hole-spacing variations. To adjust the board clip tension, loosen the nuts and screws on the Bail side of the clip and slide it away from the seam to make the clamping tighter, or closer to the seam to make the clamping looser.
Prime System Bindings
I’m thinking of buying some Karakoram bindings. What’s in the box?
- All Karakoram bindings come with an interface kit, but if you are purchasing Prime Connects, or Alpine Splitboard bindings, there are a couple of differences:
- Alpine Primes (Splitboard Bindings): All splitboard interface components, and hardware are included, except for our board clips. This includes ride mode interfaces, tour mode interfaces, heel risers + heel lock downs, and all the hardware screws you need, and detailed instructions.
- Prime Connects: If purchased in the USA, they will come with one set (2 total) of the solid board Quiver Connectors. These allow you to use your Connect bindings on solid boards right out of the box.
- To transform your Connect Bindings into highly capable backcountry splitboard bindings, you simply need to purchase the Connect Split kit. This kit includes all the same ride mode and tour mode interfaces you get with the Prime Splitboard interface, except the Connect Split kit comes with a set of single, medium height heel risers.
- If you are purchasing Prime Connect bindings outside of the USA, there are packaging differences depending on country. Please ask your local Karakoram retailer for details or send us an email: andrew@karakorambc.com.
I have a pair of Karakoram Alpine Prime splitboard bindings from last season. Any tips on how to make my changeovers faster?
The primary thing to consider with Prime system is to remove all snow from the inner seam of the splitboard. The board’s performance comes from it being clamped together by the board clips and bindings, and if there is snow in the middle then this will interfere with that. The second place to check for snow is directly under the 4 main contact points on the bindings themselves, right where they touch the surface of the topsheet. Lastly, simply taking the time to set your bindings up correctly goes a long way. You want the bindings to “fall” onto the interface without hardly any resistance.
Prime Connect bindings: What the heck are they, anyway? Are they splitboard bindings, or solid board bindings?
- Short answer: They are both, and more!
- Slightly longer answer: The Prime Connect binding models are extremely high-performance snowboard bindings that are designed to help you take your dynamic snowboarding to new levels. Using advanced engineering and manufacturing techniques, as well as detailed biomechanics analysis, we’ve innovated a new type of binding that maximizes power transfer to your edges, and optimizes rider proprioceptive feel and snowboard-to-binding feedback. These models include the standard Connect, ConnectR, Connect Soft Flex, and Women’s Connects.
- They are also Quiver Bindings, designed to be rapidly deployed onto any snowboard, solid or split, within seconds. This allows you to travel with multiple snowboards with ease. Simply throw on our foam “Quiver Protectors” onto your Quiver Connectors, and stack all your snowboards like pages in a book.
- All Connect models are also top-tier splitboard bindings! With the Connect Split kit added, you gain the benefit of being able to tour deep into the backcountry, and ride the lines of your dreams. Other than the Connect medium height single risers, the Connect Split kit utilizes the same interface components and technology as the Prime Splitboard interface. You know you’re getting the industry-leading performance you’ve come to expect from Karakoram.
I’m excited to buy some new splitboard bindings. Can the Alpine Primes be used on my resort board, as well as my splitboard? How do they ride on solid boards?
Yes! All Karakoram Prime Bindings are compatible with our splitboard ride mode interface, and Quiver Connectors. In fact, mounting your alpine splitboard bindings to any modern solid board will make that board feel like a Ferrari. The bindings want to drive the board at top speed, into the tightest turns possible.
I’ve heard that Karakoram has an amazing warranty policy. How good is the warranty program, really?
We stand behind our products 100%, and will warrant them to be free of any manufacturing defects for 2+ years to the original owner with proof of purchase which includes a lifetime warranty on linkages in the closure mechanism and a 3 year warranty on DualSpeed Risers. We also have an amazing lifetime crash replacement program. What this means is that if you decide to drive over your bindings with your car, snowmobile, or get into a fist fight with a yeti and your bindings are destroyed, we will still support you by offering you parts for a nominal fee and the return of broken parts. Lastly, we have a program that we call the “Forever Ride” support system. We feel that the rider should be able to use his/her equipment, for as long as they want. This means that if you’re outside of your standard 2-year warranty and want to upgrade certain components, or swap out worn parts, we can help here as well for a nominal fee. We really do pride ourselves in going out of our way to support our loyal customer base. Without you guys, there wouldn’t be a Karakoram, and we want to support you as best we can.
I’ve heard that the Quiver Connectors are pretty cool. Will they work with my 3-year old PrimeSL’s?
Absolutely! The Quiver Connectors really are “cool”. They allow you to use your top of the line Karakoram bindings on any solid snowboard, and offer an extraordinarily responsive connection to the snowboard. You’ll probably find that your aluminum splitboard bindings ride better on a solid board with Quiver Connectors, then any generic mainstream binding on the market. And the best part? They’re only $75 a set! Add a couple or few sets of these to your favorite quiver of boards, and now you can take multiple boards with you to the hill, and rapidly deploy your bindings on different boards as the conditions change.
Bindings and Interfaces
Set-up | Use | Maintenance
Binding and Interface Setup
I have my new bindings, so how do I set them up?
Your instruction manual highlights the binding and interface components, as well as how to set them up and begin using them. Below is a video that will show you how to set up your bindings as well.
I have my interface installed, but my bindings are still not fitting into my Ride Mode. What should I do?
Due to hole-spacing variations between splitboard manufacturers, you need to adjust your Ride Mode spacing. The industry standard spacing is 3.375 inches, plus or minus .0625 of an inch. If your hole-spacing is outside of this range, you will need to do some custom modifications to your Ride Modes.
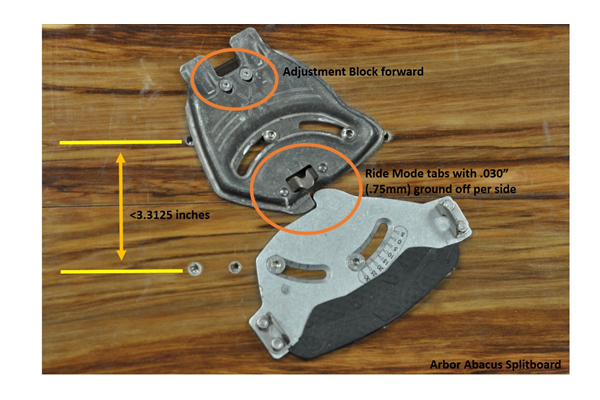
My hole spacing is narrower than 3.375”. No matter what I do I still cannot get my Ride Mode to line up with the inserts of my board.
On boards that have inserts that are less than 3.3125 inches, a modification is required to the Ride Mode. With a grinding wheel, remove a small amount of metal off the tips of the metal tabs on the Ride Modes. You will then need to move the Adjustment Block of your Toe Attachment forward to properly engage the bindings. If the block does not move far enough forward, you will need a custom one that is slightly bigger. If you have this problem, contact Russell
My board’s insert spacing across the seam is greater than 3.4375 inches and my seam pin is not engaging with the tab on my Toe Attachments.
Standard ride mode insert spacing for Karakoram Bindings is 3.375” +/- .0625”. If your ride mode insert spacing is larger, you will need to have custom Ride Modes made. Please contact Russell if you have this problem. **
**Shop machining rates apply
Bindings and Interfaces Use
I’ve set up my new splitboard interface and bindings, and I’m about to go on my first tour. Any tips or tricks I should know about before I go?
Clear the majority of snow buildup off of your bindings and interface components. Check out the video below for use tips.
How do I know when my binding is fully locked into ride mode?
All three pins should be sticking through the ride mode hold down loops, the binding heel stay lever should pop over-center (feel a snap), and the safety lock block should be engaged over the lever.
Sometimes my binding is difficult to attach to ride mode, what can I do?
Double check that most of the snow under the binding and on the surface of the Ride Mode has been removed. Sometimes the seam of the board doesn’t sit flush do to snow build up or other reasons. To alleviate this flip the board over with the binding hooked to ride mode, press on the seam (hit with palm) to make the seam flush, and then close the heel stay lever.
What kind of tricks to you have for removing snow and ice build up?
The top of the Highback has been designed to be an effective ice scraper, and is an excellent tool for removing snow in the space between your Heel Attachment loops. Also, you can use the heel stay lever on the binding to clean out snow from the Ride Mode Toe Attachment. For the Tour Mode, the Axle on your bindings will push any snow or ice out of the Tour Mode Cradle. To do this, push the axle straight down into the Tour Mode, rocking it back and forth. When the axle is all the way into the Tour Mode, rotate the binding down and the Tour Mode Clip will fracture away any remaining ice.
Can I go from Tour to Ride Mode without taking my bindings off?
Yes, you can. This does require stable flat ground to ensure the board seam doesn’t shear. If you are having difficulty it is usually because you have snow built up on the bottom of your bindings or toe side ski is pushed down below the heel side ski. We recommend practicing inside before trying on snow.
Can you step into tour mode without taking off your bindings?
Yes, align the toe pin in the cradle of the tour mode, then, making sure the Tour Axle is straight and fully settled into the cradle, rotate your heel down. Reach down and engage the final camover to fully lock into Tour Mode.
Does snow and / or ice interfere with the Tour Mode?
The Tour Mode has been engineered to be self-cleaning of snow and ice. Use the Tour Mode Axle on your binding to push snow and ice out of the cradle, and as you rotate the binding down onto the Tour Mode Lever, the clamp will fracture away any remaining ice buildup.
Can you lock down your heel in tour mode?
Yes!
Maintenance
How do I take care of my bindings? Is there any maintenance I need to do on a regular basis?
Similar to a bicycle, our bindings shouldn’t need more than a regular inspection of screws. Areas to keep an eye on are the Side Screws, Highback / Strap T-nuts, and Tour Mode Axle. Because of the high degree of cyclic loading during splitboard touring, it is possible for screws to become loose over time. It is very important to keep your screws tight, as they prevent your bindings from experiencing any unusual flexing and / or loading during touring or riding. If you do find that your screws or axle have become lose, apply a few drops of Locktite to the threads and re-torque them.
MAINTENANCE VIDEO
What type of maintenance do I need to perform to my splitboard interface?
Your interface will require a bare minimum of maintenance. Simply checking your hardware on a regular basis and re-applying Locktite goes a long way to prolonging the life of your splitboard system.
Heel Lock Down / Dual Riser
Heel Lock Down Set up
My heel lockdown is not engaging. What do I do?
The heel lock down is designed to work with the nominal splitboard ride mode insert spacing of 3 3/8 inches. If your splitboard has spacing that is significantly larger than 3 3/8 inches the heel lock down will be loose. If your splitboard has spacing significantly smaller than 3 3/8 inches the heel lock down will be tight. The majority of splitboards on the market have 3 3/8 inch spacing, so this should not be an issue for most of you. However there are some boards that are larger or smaller. Our new ride mode interfaces for ’12-13 resolve the hole-spacing issue, however ’10-11 and ’11-12 interfaces can have an issue if the board insert spacing is significantly off. If you happen to encounter this problem, please contact us and we will help to provide a solution.
Heel Lock Down Use
Heel Lock Down Maintenance
How do I ensure that my Heel Lockdown / Dual Riser continues to work smoothly over the long term?
The primary thing to remember with all 12-13 and 13-14 Heel Lockdown / Dual Risers is to always make sure that your climbing wire is in the REAR riser position before flipping it up for climbing mode. If you flip the wire up when it is in the forward Heel Lockdown position, it can bent back and cause damage to the wire and the base.
My climbing wires don’t seem to be staying up in Climbing Mode.
If you do happen to flip the wire up in the Heel Lockdown position, this can bend the wire out slightly, making it fit looser. Simply take your Lockdown / Riser base apart and re-bend the wire to fit tighter.
Crampons
Crampon info goes here.
Vert Adapters
Does Karakoram make Verts?
No. We make adapters so you can use your Karakoram Splitboard bindings on Verts.
How do I attach my Karakoram Splitboard Bindings to Verts?
Our Vert Adapters are easily screwed onto Verts.
Air Strap
What is the AirStrap? Why is there no ratchet?
The AirStrap is a minimalistic Toe Strap that stretches over the toe of your boot. During prototyping, we found that our favorite straps were the ones that fully engaged over the toe at a 45 degree angle. The AirStrap firmly secures the toe of your snowboard boot into the front of your binding and stretches over a metal clip. It gives a responsive riding feel, and allows us to cut nearly 70 grams from each binding.
Any maintenance?
Under normal use the AirStrap will last for several seasons. Like any plastic however, exposure to sharp blades or open flames can compromise its integrity.
Return Policy & Privacy Policy
For Returns: See Warranty
Privacy Policy:
We take privacy seriously. We will not sell, rent, trade, or otherwise share your personal information with third parties for their promotional use without your permission. We do use Google Analytics Demographics and Interest Reporting, which uses cookies to track general anonymous data about the demographics using our website, and how they are using it, so that we can optimize user experience with our website. You can opt out of any Google Analytics features by going to: Google’s opt-out. By using or accessing our Site or services, you signify that you agree to be bound by this Privacy Policy.